
今回は最近受けた案件について書いていきます。
下記のようなスライダーを表示させたいという要望に対して皆さんはどのように実装されますか。


ててて
@yuya
見出し見出し見出し
見出し見出し見出し
見出し見出し見出し
Before
テキストテキスト

After
テキストテキストテキスト
テキストテキストが入ります。テキストテキストが入ります。テキストテキストが入ります。
ててて
@yuya
見出し見出し見出し
見出し見出し見出し
見出し見出し見出し
Before
テキストテキスト
After
テキストテキストテキスト
テキストテキストが入ります。テキストテキストが入ります。テキストテキストが入ります。
ててて
@yuya
見出し見出し見出し
見出し見出し見出し
見出し見出し見出し
Before
テキストテキスト
After
テキストテキストテキスト
テキストテキストが入ります。テキストテキストが入ります。テキストテキストが入ります。
ててて
@yuya
見出し見出し見出し
見出し見出し見出し
見出し見出し見出し
Before
テキストテキスト
After
テキストテキストテキスト
テキストテキストが入ります。テキストテキストが入ります。テキストテキストが入ります。
ててて
@yuya
見出し見出し見出し
見出し見出し見出し
見出し見出し見出し
Before
テキストテキスト
After
テキストテキストテキスト
テキストテキストが入ります。テキストテキストが入ります。テキストテキストが入ります。
ててて
@yuya
見出し見出し見出し
見出し見出し見出し
見出し見出し見出し
Before
テキストテキスト
After
テキストテキストテキスト
テキストテキストが入ります。テキストテキストが入ります。テキストテキストが入ります。
スライダーを実装するプラグインとしてShortcodes Ultimate、Smart Slider 3、またブロックエディターの拡張機能拡張プラグインであるSpectraなどがあります。
Shortcodes Ultimate、Smart Slider 3は画像のスライドに特化しているので、要件に合わなそうです。Spectraでもかなり近いことはできるのですが、1画面にカラムをどれくらい表示させるか(今回の場合は左右のスライドチラ見せを3にしています)など、細かな設定ができるようにするにはJavaScriptのプラグインを使用するのが良さそうです。
スライダープラグインは Splide、Slick、Swiperが人気ですが、今回はSwiperを使用します。
違いや使い分けはまたの機会に、、、
Swiperの基本
SwiperのCDNを読み込み
ヘッダーにSwipeのCSSとJavaScriptのCDNを読み込みます。
<!-- Swiper-->
<link rel="stylesheet" href="https://cdn.jsdelivr.net/npm/swiper@11/swiper-bundle.min.css"
/>
<script src="https://cdn.jsdelivr.net/npm/swiper@11/swiper-bundle.min.js"></script>
HTMLにスライド要素を追加
<div class="swiper-container">
  <div class="swiper-wrapper">
    <div class="swiper-slide">Slide 1</div>
    <div class="swiper-slide">Slide 2</div>
    <div class="swiper-slide">Slide 3</div>
  </div>
  <!-- Add Pagination -->
  <div class="swiper-pagination"></div>
</div>
JavaScriptでスライダーの初期化を行う
<script>
  var swiper = new Swiper('.swiper-container', {
    pagination: {
      el: '.swiper-pagination',
    },
  });
</script>
こちらが基本の作りです。
.swiper .swiper-wrapper .swiper-slide の3つは必須です。
.swiper-wrapper と .swiper-slide の間に他の要素を割り込ませたりするとうまく動かなくなります。
今回、私は.swiper-wrapper と .swiper-slide の間に他の要素があり、ハマってしまっていました、、、。
その他の要素は必要に応じて追加しましょう。
.swiper の中には他の独自コンテンツを追加しても問題ありません。
ブロックエディタを使用して実装方法
基本の構成を抑えたところで、ブロックエディタとスライダーを組み合わせていきます。
HTML(ブロックエディタ)を構築
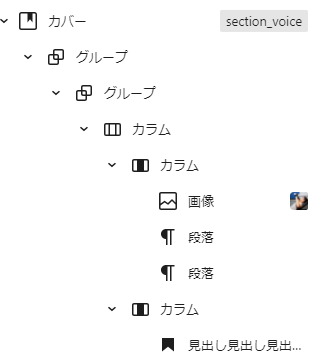
今回はあくまでブロックエディタありきなので、まずはスライダーの中身を下図のように作ります。
HTMLにスライド要素を追加
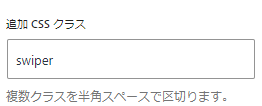
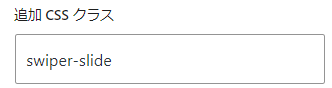
スライドする親部分にswiperというclassを付与します
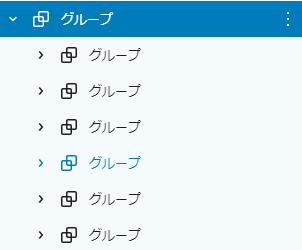
スライドする中身にswiper-slideというclassを付与します
おさらいですが、.swiper .swiper-wrapper .swiper-slide の3つは必須です。
あとはswiper-wrapperを入れる必要があるのですが、、、
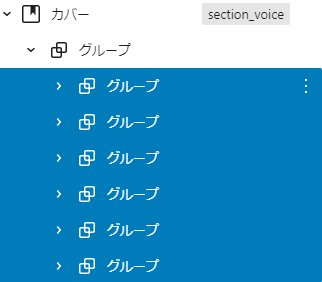
WordPressのグループブロックの仕様上、グループの子にdivが挟まっているんです!(緑部分)
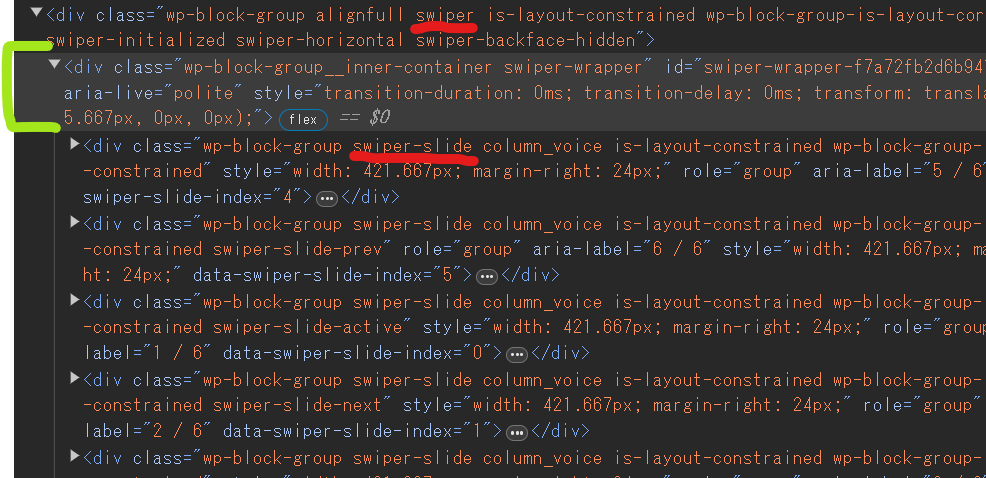
この部分は勝手にdivが入っているので、これまでのようにサイドバーからcssを追加はできません。
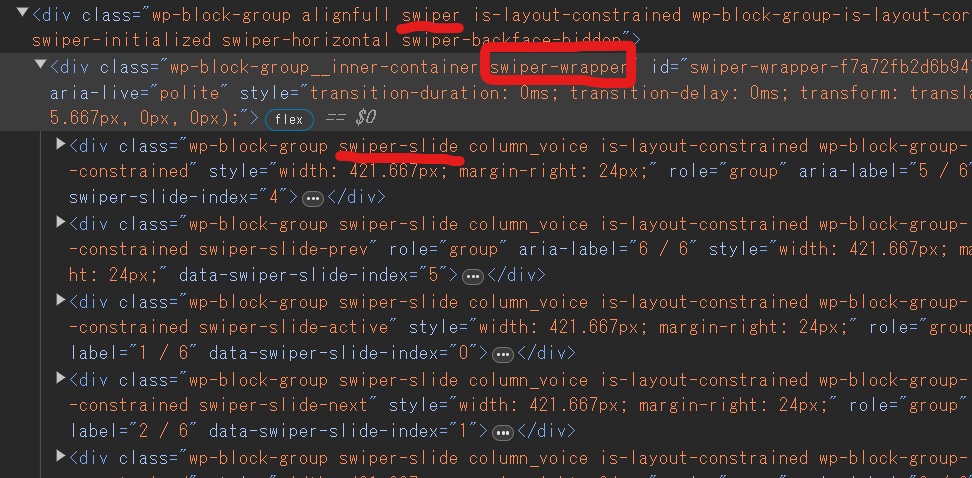
そこで jQueryを使ってswiper-wrapperというクラスを付与しました。
jQuery('.swiper > div').addClass('swiper-wrapper');これによって赤枠のようにクラスが付与されました。
あとはSwiper用のコードを書きます。(cssは割愛します)
const swiper = new Swiper(".swiper", {
        loop: true, //最後までいったら最初から デフォルトはfalse
        //ドットを指定
        pagination: {
          el: ".swiper-pagination",
          clickable: true //ドットのクリックを有効化
        },
        //ページャーを指定
        navigation: {
          nextEl: ".swiper-button-next",
          prevEl: ".swiper-button-prev"
        },
        slidesPerView: 1.2, // 左右なし
        centeredSlides: true, //左右のスライドチラ見せ
        spaceBetween: 10, // 画像間の余白
        //レスポンシブ
        breakpoints: {
          1000: { //768px以上なら次を適用
            slidesPerView: 3, //左右のスライドチラ見せ
            spaceBetween: 24, // 画像間の余白
          }
        }
      });
まとめ
いかがでしょうか。
今回お伝えしたかったのは、ブロックエディタとJavaScriptプラグインを組み合わせた構築方法についてでした。
ブロックエディタは便利ではあるものの、自分でコントロールできないhtml構造になっていたりします。
その部分をJavaScriptやjQueryを使って工夫できると、幅が広がるかなと思います。