第4回目です。
今回の目標は、前回届かなかった
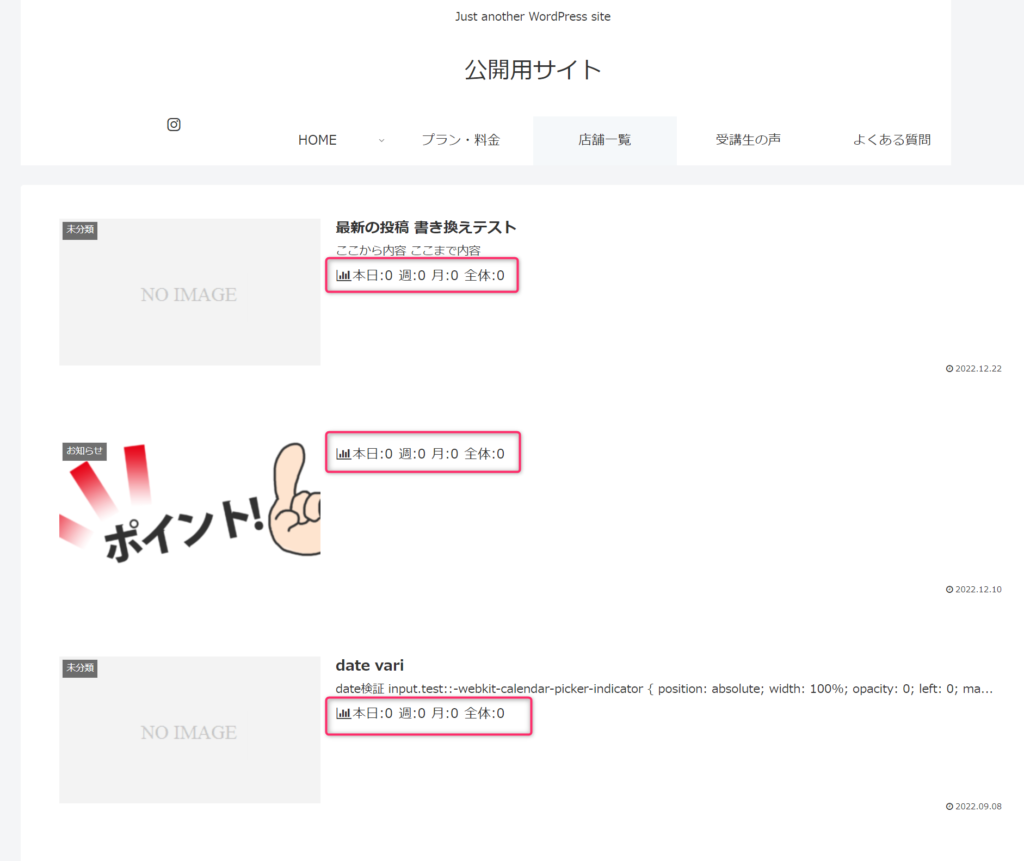
「ホームページ(トップページ)設定のデフォルトである最新の投稿画面を書き換えてみる。」
でいきましょう!
以下画像(最新の投稿トップ)の赤で囲った部分を変更していきます。

巷では ChatGPT なるものが話題になっていて個人的にも革新が起きるんだろうなと感じています。
「シンプルで若い人向けのHPをWordPressでXserverに作って」などと頼むだけで、そこそこのものが出来上がるようになるのでしょうか?
なんにせよ、IT業界は技術もどんどん新しいものが生まれていくので常にアンテナを張っておくのは大事です。
また情報の収集方法についてのブログも書きます!
では、さっそく本題に入って行きましょう。
はたして今回は目標を達成する事が出来るのでしょうか??
前回は最新の投稿で表示されるループ部分まで見ました。
今回はその中身を読み進めていきましょう!
<a href="
<?php echo esc_url(get_the_permalink()); ?>
" class="entry-card-wrap a-wrap border-element cf" title="
<?php echo esc_attr(get_the_title()); ?>
">
  <article <?php echo $article_id_attr; ?> <?php post_class(array('post-' . get_the_ID(), 'entry-card', 'e-card', 'cf')); ?>>
    <figure class="entry-card-thumb card-thumb e-card-thumb">

      <?php
      //サムネイルタグを取得
      $thumbnail_tag =
        get_the_post_thumbnail(
          get_the_ID(),
          get_entry_card_thumbnail_size($count),
          array(
            'class' => 'entry-card-thumb-image card-thumb-image',
            'alt' => '',
            'loading' => 'lazy',
            'decoding' => 'async',
          )
        );
      // サムネイルを持っているとき
      if (has_post_thumbnail() && $thumbnail_tag) : ?>
        <?php echo $thumbnail_tag; ?>
      <?php else : // サムネイルを持っていないとき
      ?>
        <?php echo get_entry_card_no_image_tag($count); ?>
      <?php endif; ?>

      <?php the_nolink_category(null, apply_filters('is_entry_card_category_label_visible', true)); //カテゴリラベルの取得
      ?>
    </figure><!-- /.entry-card-thumb -->

    <div class="entry-card-content card-content e-card-content">
      <h2 class="entry-card-title card-title e-card-title" itemprop="headline">
        <?php the_title() ?>
      </h2>

      <?php //スニペットの表示
      if (is_entry_card_snippet_visible()) : ?>
        <div class="entry-card-snippet card-snippet e-card-snippet">

          <?php echo get_the_snippet(get_the_content(''), get_entry_card_excerpt_max_length()); //カスタマイズで指定した文字の長さだけ本文抜粋
          ?>
        </div>

      <?php endif ?>

      <?php //PVエリアの表示
      if (is_admin_index_pv_visible() && is_user_administrator() || apply_filters('public_page_entry_card_pv_visible', false)) {
        get_template_part('tmp/admin-pv');
      } ?>
      <div class="entry-card-meta card-meta e-card-meta">
        <div class="entry-card-info e-card-info">

          <?php
          //更新日の取得
          $update_time = get_update_time(get_site_date_format());
          //投稿日の表示
          if (is_entry_card_post_date_visible() || (is_entry_card_post_date_or_update_visible() && !$update_time && is_entry_card_post_update_visible())) : ?>
            <span class="post-date"><span class="fa fa-clock-o" aria-hidden="true"></span><span class="entry-date">
                <?php the_time(get_site_date_format()); ?>
              </span></span>
          <?php endif ?>

          <?php //更新時の表示
          if (is_entry_card_post_update_visible() && $update_time && (get_the_time('U') < get_update_time('U'))) : ?>
            <span class="post-update"><span class="fa fa-history" aria-hidden="true"></span><span class="entry-date">
                <?php echo $update_time; ?>
              </span></span>

          <?php endif ?>

          <?php //投稿者の表示
          if (is_entry_card_post_author_visible()) : ?>
            <span class="post-author">
              <span class="post-author-image">
                <?php echo get_avatar(get_the_author_meta('ID'), '16', null); ?>
              </span>
              <span class="post-author-name">
                <?php echo get_the_author(); ?>
              </span>
            </span>

          <?php endif ?>

          <?php //コメント数の表示
          $count = get_comments_number();
          if (is_entry_card_post_comment_count_visible() && is_single_comment_visible() && apply_filters('entry_card_post_comment_count_visible', true, $count)) : ?>
            <span class="post-comment-count"><span class="fa fa-comment-o" aria-hidden="true"></span>
              <?php echo $count; ?>
            </span>

          <?php endif; ?>
        </div>
        <div class="entry-card-categorys">
          <?php the_nolink_categories() ?>
        </div>
      </div>
    </div><!-- /.entry-card-content -->
  </article>
</a>
102行もあるので、始めはおえってなりますよね。
しかし、1行目と最終行を見て下さい。
<a> で始まり、</a> で終わっていますね。
そうです、これは大きな一つの<a>タグという事になります。
このようにするのには理由があって、どこをクリックしてもリンク先へ遷移させる事ができます。
しかし、<a>タグ内では出来ない事もあったりするので、実際に書く時は注意が必要です。
2~5行目です。
<?php echo esc_url(get_the_permalink()); ?>
" class="entry-card-wrap a-wrap border-element cf" title="
<?php echo esc_attr(get_the_title()); ?>
">
これをよく見ると、<a>タグの href と class と title を指定しているだけです。
href はリンク先ですね。そこに、<?php echo esc_url(get_the_permalink()); ?> としています。
esc_url() とは?
テキストや属性などのURLを無害化する時に用いる関数
よしなにURLとして認識出来る形になおしてくれます。詳しくはこちら
その中に
get_the_permalink() があります。
これは、投稿または固定ページの パーマリンク を取得します。(取得するだけ)
ここでは取得したものを esc_url() に入れて無害化したものを echo しています。
the_permalink() というものもあり、ややこしいですがこちらは出力をします。(echo不要)
色々書いて挙動を確認してみて下さい!
class はベタ書き。
title 属性は HTML のグローバル属性。
いわゆる、どのタグにでも設定出来る属性です。
要素をホバー時にツールチップで表示させたり出来ます。詳しくはこちら
属性値として、<?php echo esc_attr(get_the_title()); ?> としています。
esc_attr() とは?
< > & ” ‘ (小なり、大なり、アンパサンド、ダブルクォート、シングルクォート) 文字参照をエンコードします。
出力した内容にこの記号があると、予期しない場所でタグが閉じられたり、文字列が切れたりしてしまいます。
それを防ぐ為のものです。詳しくはこちら
その中に
get_the_title() があります。
これは、投稿のタイトルを取得します。(取得するだけ)
get_the_permalink() のタイトル版ですね。
つまり、マウスホバーで投稿タイトルがツールチップで表示されるようにしている。というわけです。
6・7行目です。
  <article <?php echo $article_id_attr; ?> <?php post_class(array('post-' . get_the_ID(), 'entry-card', 'e-card', 'cf')); ?>>
<figure class="entry-card-thumb card-thumb e-card-thumb"><article>タグですね。
<?php echo $article_id_attr; ?> とは?
$xxxx は変数ですね。便宜上aタグの外は除外しましたがaタグに入る前に定義されています。
id=”” の中に get_the_ID() を入れています。
get_the_ID() とは?
言わずもがな!ですね。詳しくはこちら
次は <?php post_class(array(‘post-‘ . get_the_ID(), ‘entry-card’, ‘e-card’, ‘cf’)); ?> の部分。
post_class() とは?
自動で投稿タイプやカテゴリー情報などを追加してくれます。
引数に渡したものは別途追加出来ます。詳しくはこちら
array() とは?
これはPHP の関数ですね。今まではWordPressの独自関数です。
簡単に言うと、配列を定義する事が出来ます。今回は4つの引数が指定されていますので中身が4つの配列。とういう事になります。
<figure>はベタ書きですね。
このタグは「フィギュア」と読みます。詳しくはこちら
9~32行目です。
      <?php
      //サムネイルタグを取得
      $thumbnail_tag =
        get_the_post_thumbnail(
          get_the_ID(),
          get_entry_card_thumbnail_size($count),
          array(
            'class' => 'entry-card-thumb-image card-thumb-image',
            'alt' => '',
            'loading' => 'lazy',
            'decoding' => 'async',
          )
        );
      // サムネイルを持っているとき
      if (has_post_thumbnail() && $thumbnail_tag) : ?>
        <?php echo $thumbnail_tag; ?>
      <?php else : // サムネイルを持っていないとき
      ?>
        <?php echo get_entry_card_no_image_tag($count); ?>
      <?php endif; ?>

      <?php the_nolink_category(null, apply_filters('is_entry_card_category_label_visible', true)); //カテゴリラベルの取得
      ?>
    </figure><!-- /.entry-card-thumb -->
get_the_post_thumbnail() とは?
投稿やページの編集画面で設定することができるアイキャッチ画像を取得します。
詳しくはこちら を今回は見てみましょう。そこには以下のように書かれています。

パラメータとは引数の事です。
今回も3つの引数を渡しています。
1つ目の引数には
get_the_ID() を渡しています。投稿IDですね。
2つ目の引数には
get_entry_card_thumbnail_size($count) を渡しています。
これは Cocoon の独自関数なので、Ctrl + クリックで見てみましょう。
中ではカードタイプによって大きさを切り分けているようですね。
ここではさらっと流します。
3つ目の引数には
array(
‘class’ => ‘entry-card-thumb-image card-thumb-image’,
‘alt’ => ”,
‘loading’ => ‘lazy’,
‘decoding’ => ‘async’,
)
を渡しています。
クラス名、alt属性値などを設定しています。こちらもさらっと流します。
これら3つの引数とともにget_the_post_thumbnail() を変数$thumbnail_tagに格納しています。
次はif (has_post_thumbnail() && $thumbnail_tag) : ?> です。
もし投稿にアイキャッチが設定されている &&(かつ)上記変数が設定されていれば…
<?php echo $thumbnail_tag; ?>
get_the_post_thumbnail() を3つの引数とともに呼び出し、<img>タグで出力する。
実際のタグは以下のようになります。
<img src="画像URL" alt="" class="no-image entry-card-thumb-image list-no-image" width="320" height="180" loading="lazy" decoding="async"><?php else : ?> // サムネイルを持っていないとき
<?php echo get_entry_card_no_image_tag($count); ?>
get_entry_card_no_image_tag()とは?
Cocoonの独自関数で、NO IMAGE と書かれた画像をサイズに併せて出力しています。
次は <?php the_nolink_category(null, apply_filters(‘is_entry_card_category_label_visible’, true)) ?> の部分。
the_nolink_category() とは?
Cocoonの独自関数で、リンク無しのカテゴリーを取得しています。
中で get_the_category() が走っています。詳しくはこちら
取得したものを画像の左上に表示させています。
ここで<figure>タグが閉じられます。
34~37行目です。
    <div class="entry-card-content card-content e-card-content">
      <h2 class="entry-card-title card-title e-card-title" itemprop="headline">
        <?php the_title() ?>
      </h2>
ここはそこまで難しく無いですね!
div の中に h2 を置き、その h2 に the_title() を入れてます。
the_title() とは?
今回は the_xxxx() シリーズです。出力をするタイプです。
なので echo も書かなくてもOKです。
39~47行目です。
      <?php //スニペットの表示
      if (is_entry_card_snippet_visible()) : ?>
        <div class="entry-card-snippet card-snippet e-card-snippet">

          <?php echo get_the_snippet(get_the_content(''), get_entry_card_excerpt_max_length()); //カスタマイズで指定した文字の長さだけ本文抜粋
          ?>
        </div>

      <?php endif ?>
スニペットって色んな使われ方をするので、その時の前後の雰囲気で判断する必要があります。
意味をググると「スニペットとは、本来は「断片」という意味の一般的な単語だが、SEOの世界では、検索後の結果ページで表示されるWebページの説明文を指す。」とあり、ここでは検索結果の画面と同じような出力になる事からそう呼んでいるのだと思います。
if (is_entry_card_snippet_visible()) : ?>
Cocoonのオプションです。表示させる設定なら表示させるコードに分岐させます。
次は、<?php echo get_the_snippet(get_the_content(”), get_entry_card_excerpt_max_length()); ?>
get_the_snippet() とは?
記事の抜粋(excerpt)
無ければ SEO設定のディスクリプション
無ければ 「All in One SEO Packの値」
無ければ 「抜粋」を表示させるようです。
最後「抜粋」は本文の頭70文字を抜粋したものです。
excerpt とは別物のようです。
Cocoon独自のものですが、一つだけ覚えておくと良いのは、
get_the_content() とは?
投稿のコンテンツ(本文)を取得します。詳しくはこちら
49~52行目です。
      <?php //PVエリアの表示
      if (is_admin_index_pv_visible() && is_user_administrator() || apply_filters('public_page_entry_card_pv_visible', false)) {
        get_template_part('tmp/admin-pv');
      } ?>
ここが今回のゴールになります。
if (is_admin_index_pv_visible() && is_user_administrator() || apply_filters(‘public_page_entry_card_pv_visible’, false))
まずはここから
第1条件 && 第2条件 || 第3条件
という形になっています。
第1条件 と第2条件 がどちらも true
第3条件 が true
この2パターンの時のみ中に入れます。
案外自分で書く時は失敗しがちなので、しっかりローカルでパターンをテストしてから実装しましょう!
条件自体は Cocoon の設定 や フィルターフックなので流します。
get_template_part(‘tmp/admin-pv’) とは?
やっとここまで来ましたね!中を見てみましょう…
すみません、やっぱり長くなりそうだったので今回はこのあたりで終わります💦
次回こそ!書き換えしてみせます!
地元で何年ぶりかに雪が積もりました。
愛犬は夜中に車が前を通過するたびに雪を踏む「ぎゅう」という音に反応し吠えられ…おおはしゃぎでした!
みなさん風邪などひかないように温かい格好をして作業をしましょう!
ではまた次回!


